Creating the Directus Back-End for the Blog
Dec 16, 2024Welcome to my first blog post! I am excited to share my journey of creating this blog website using Directus and Angular. In this post, I will begin with a straightforward setup, and in future posts, I will describe the additional features I will be adding. Stay tuned for updates!
Why I Chose Directus
Few years ago, a friend shared an idea for a website where she could document her hikes. Since I couldn't find a similar tool online, I created this site for her. Balancing this project with my family commitments means I have limited time, but I wanted to avoid the simplicity of using a content management system (CMS). Therefore, I set the following goals for myself:
- Improve my Angular knowledge: use it for the front end.
- Gain more experience with typescript, express, and DDD (Domain Driven Design): implement a custom backend.
- To use a hyperscaler to create a scalable cloud architecture, I picked the Google Cloud Platform.
- Make the website costs as low as possible, preferably free: many aspects, including the use of Firebase with Firestore.
I implemented the website, and suddenly users started to arrive. I wanted to make improvements, such as creating an admin panel to approve public posts, but I realized that would require a significant effort. Instead, I considered adding some advanced filters to the user interface, which would also be a large undertaking. I realized that using a Content Management System (CMS) could simplify these tasks considerably. Although I achieved my original goals, adopting a CMS would ultimately be more beneficial in the long run.
I began my search for a suitable Content Management System (CMS), not just for this specific project, but to use for any of my future websites. Since I have a preference for TypeScript and Angular, I focused on finding a headless CMS based on Node.js. This led me to discover Strapi.
I started creating some simple example applications and found that I really enjoyed the process. Having all the data as code is very developer-friendly; I could track changes using Git as usual and easily integrate my changes from the development environment into production. As a result, I began using it to create a website for my trainer. I was able to quickly build and deploy the site, and whenever I had questions, I found the answers in the documentation. Overall, I was pleased with both the process and the outcome.
However, one morning I opened the admin panel on my phone and was disappointed to find it was a mess. I couldn't edit any of the fields because they didn't fit the screen - the user interface was not responsive. After a quick search, I discovered that Strapi is not optimized for mobile, as most of their users don't require this feature. Unfortunately, my trainer has an old and slow laptop and frequently travels for training sessions and competitions on weekends. He would likely use his mobile device to quickly add content and updates.
So, I have to say goodbye to Strapi for now. Perhaps next time!
I eventually discovered Directus and started to appreciate it despite the many challenges I encountered while using it. The admin interface is very user-friendly, responsive, and customizable. You can create content with relationships in just a few minutes and design useful flows without writing any code. Additionally, it offers insights that allow you to create dashboards based on your data. However, the documentation is lacking, and since the model is stored in the database, migration can be quite difficult. Although there are some utilities available to assist with migration, my experience suggests that its stability varies depending on the database you use. So far, I have faced numerous issues, even with a simple model. There are separate forums like GitHub issues or Discord where we can raise our questions, but so far I was looking for solutions on my own.
These are just technical details. For my end users, Directus is a great fit. If I can find solutions to the issues I'm encountering, I will be very satisfied. In the meantime, let's continue exploring it.
Designing Collections
To get started, I want to keep things simple, so I will create a basic setup to display blog posts on the website. I won't enable user registration just yet, which means I need to avoid any operations that would require an authenticated user. As in the coming months I'll write about the creation of this website, it would make sense to implement a way to group the blog posts. Let's call this grouping "series". Additionally, it would be beneficial to include tags for the posts, allowing users to easily filter topics that interest them.
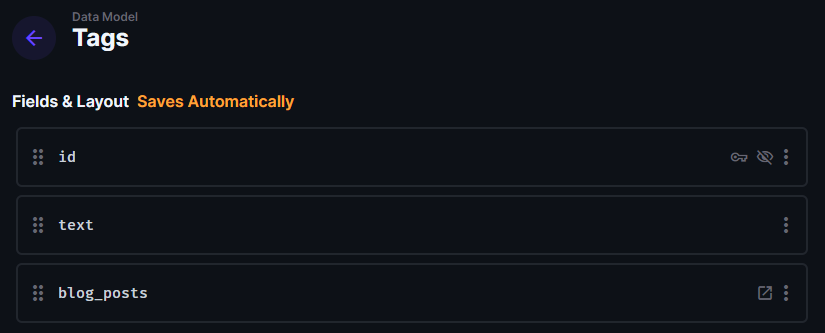
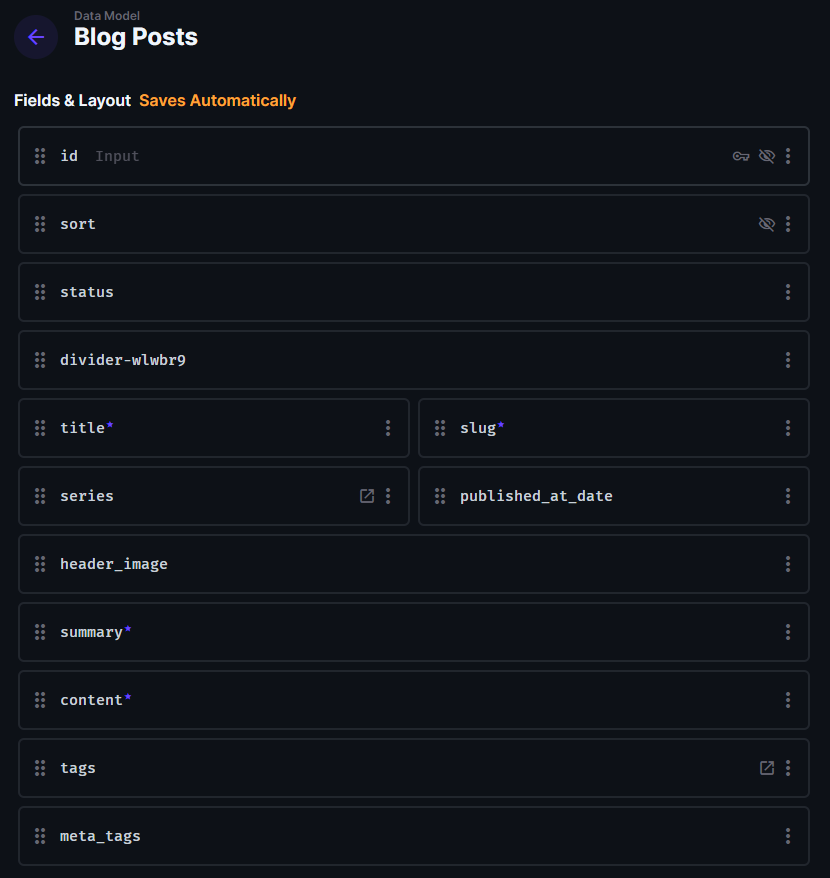
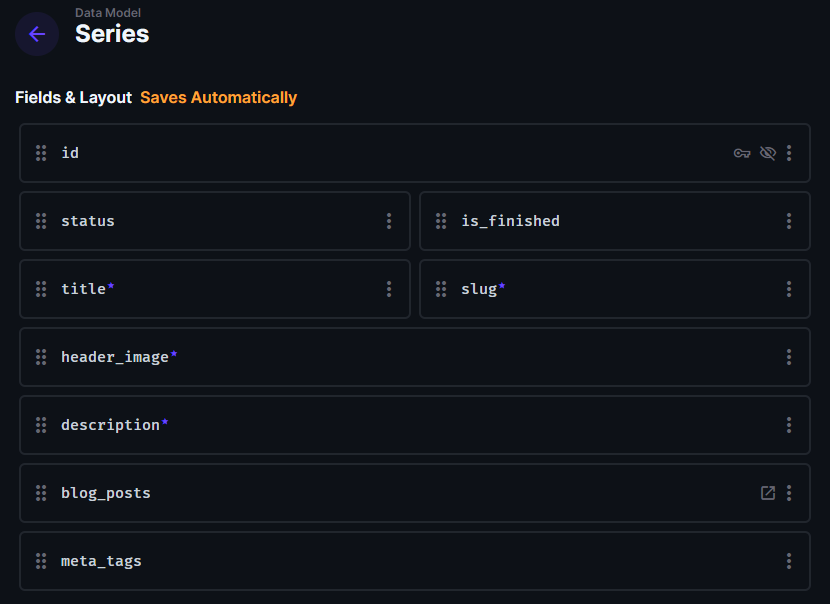
So there will be a collection for series, one for blog posts connected via a one-to-many (O2M) relationship, and another for tags which will have a many-to-many (M2M) relationship with blog posts. The outcome will look like this:

I would like to implement a lifecycle for series, so I need to include a status field. Initially, this will just be a selection, but I may create more complex workflows in the future. Each series also requires a unique title, a description, and a header image. Maybe a field to indicate whether the series is already finished is useful as well. To achieve good SEO I'll also add a meta tags field that will be just an array of strings.
Blog posts would have a similar status field to a series and a sort field to enable sorting of posts inside a series. The fields required on posts are title, summary, publication date, header image, and, of course, the content itself. As tags might not be completely suitable for meta information I'll need to add a meta tags field here as well.
Tags are straightforward text entries. To improve organization, I added a sorting column in the junction collection for my blog post tags. Additionally, tags are linked back to the blog posts, so clicking on a tag on the site will display the related blog posts.
That sounds like a solid plan. Let's go ahead and get started with Directus.
Creating Collections
I'll not describe how to start a Directus instance or create the collections as you can find this information in the Directus Docs. I'd rather focus on the creation of the collections on a high level.
To add all the planned relations without switching between collections, I will start with the tags. In addition to the id field, it only requires an input field for the text property. Since I want to use the text in URLs, it has to be URL-safe. To achieve this, I must check the following option: Interface → Make entered value URL safe. The text must also be unique and indexed, as it will be used in queries when a user searches based on tags. These options are in the Schema section.
We don't need to create the blog_posts_tags collection manually, as Directus will automatically generate it when we establish a new many-to-many (M2M) relationship. Now, let's move on to the blog_posts collection. When we create it, we can immediately select the status and sort fields, so there is no need for any additional setup. I won't go into detail about adding the basic fields, but I will highlight any special cases that arise.
Since slug will be used in website URLs, it must be made URL-safe, unique, and indexed. You can find these options as I described above for tags.
To incorporate the relation to the tags collection, we only need to define the target collection when selecting a many-to-many (M2M) relationship for a field type. Directus will manage the rest automatically. However, since we also want to establish a relationship from tags to blog posts, an additional step is necessary. Fortunately, there is a straightforward option available once you click the Continue in advanced filter creation mode button. You need to check the following option: Relation → Add M2M to "tags". When selecting this option, Directus will automatically create the corresponding side of the relationship in the tags collection.
The blog posts collection is now ready for use, and the final part is creating the series collection. When setting up this collection, you can directly select the status field to avoid making additional configurations later. The fields are straightforward, so I won't elaborate further. The relationship between the series collection and the blog posts will be a one-to-many (O2M) relationship. Upon creation, we need to choose the target collection and specify the foreign key. Simply enter "series," and Directus will automatically add this field to the blog posts collection once the relationship is saved.
Defining Access Policies
We have our collections, but if you open the API in a private browser window and try to access any of the above collections, you will receive an unauthorized error.
GET http://localhost:8055/items/tags
To ensure public access to our resources, we need to update the Public policy. You can find this policy under Settings → Access Policies → Public. In this section, we should add all the collections we have created and enable read access for them.
Additionally, since I want to restrict access to blog posts and series that are not yet published, I have set up custom access for these collections. This allows us to define a filter that only permits viewing items with the Published status. After updating the policies, the request mentioned above should return all of the tags.
To enable public access to images, you must grant read access to the directus_files collection. When allowing public access to files, I prefer to restrict the fields that users can access. This can also be accomplished through custom access settings.
Conclusion
In conclusion, the process of setting up a basic backend for the blog using Directus has proven to be both efficient and manageable. With support for series, blog posts, and tags now in place, it's clear that with some upfront planning and a bit of experience, this setup can be achieved in just a few hours. This streamlined approach not only simplifies content management but also sets a strong foundation for future enhancements. As we continue to build out the blog, I'm excited to explore the potential Directus offers for creating a dynamic and engaging online platform.
Coming Next
Next, I'll implement the Angular front-end for the site and then in my upcoming posts, I will continue to enhance the blog by implementing the following features:
- Hosting the site for free
- Enabling user registration
- Allowing comments
- Adding a "like" feature
- Implementing a favorites system
- Managing post-lifecycles through workflows
- Generating post summaries with AI
- Sending email notifications when a new post is created
This list is not final and may change in the future. If you're interested in following the progress, please subscribe to the newsletter. However, as you've seen in this post, this feature is not yet available. If you're reading this in the future, then look for the subscribe button!